По умолчанию iTunes или Finder создает резервные копии устройств iOS в глубоко скрытой папке на внутреннем диске. Нет никаких конкретных настроек, которые можно было бы включить и выбрать другое местоположение. Эти резервные копии могут занимать несколько гигабайт. Таким образом, для лучшего управления хранилищем вы можете изменить место резервного копирования iPhone на Mac или ПК. Позвольте мне показать вам, как вы можете переместить хранилище резервных копий iOS по умолчанию.
- Изменение местоположения резервной копии iPhone на Mac под управлением macOS Catalina или более поздней версии
- Восстановите папку резервного копирования iPhone в исходное место на Mac
- Измените местоположение резервной копии iTunes с помощью iPhone Backup Extractor
- Расположение резервной копии iTunes уже изменено, но резервная копия не отображается?
- Как изменить расположение резервной копии iTunes iOS на ПК с Windows
Изменение местоположения резервной копии iPhone на Mac под управлением macOS Catalina или более поздней версии
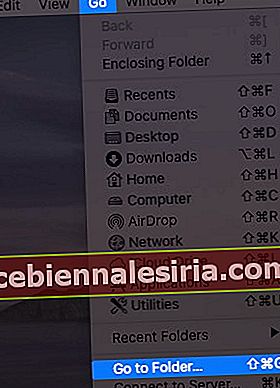
- В верхней строке меню нажмите Перейти → Перейти в папку… Введите или скопируйте и вставьте этот точный адрес ~ / Библиотека / Поддержка приложений / MobileSync.

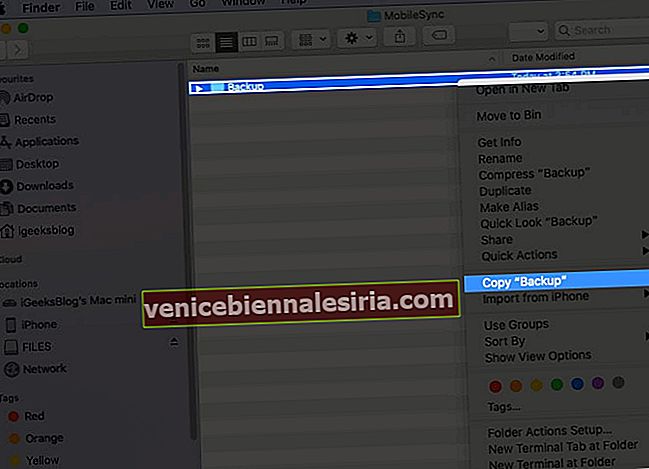
- Теперь вы находитесь в том месте, где ваш Mac по умолчанию делает резервные копии. Щелкните правой кнопкой мыши папку «Резервное копирование» и выберите « Копировать« Резервное копирование » .
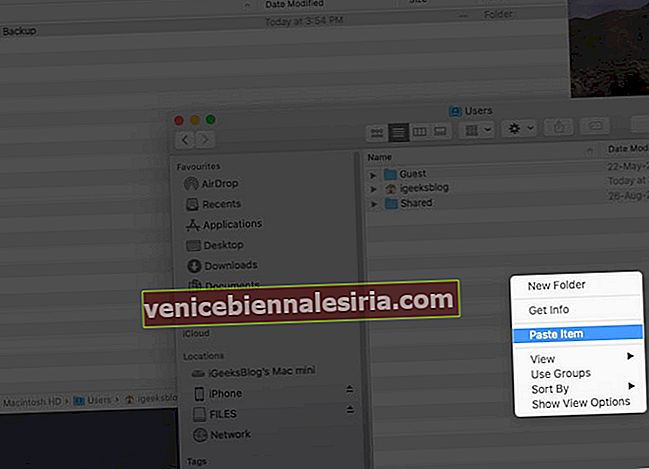
- Теперь (откройте второе окно Finder и) перейдите в то место, где вы хотите создать новую папку резервных копий iPhone. Это может быть Рабочий стол, Документы, где-то новая папка. Когда вы окажетесь в этом месте, щелкните правой кнопкой мыши и выберите « Вставить элемент» . Дождитесь завершения процесса копирования текущей папки резервного копирования в это новое место. Не закрывайте это окно Finder. Это понадобится вам на шаге 6 ниже.
- После копирования вернитесь в первое окно Finder (~ / Library / Application Support / MobileSync), щелкните правой кнопкой мыши папку Backup и выберите Rename (или выберите папку и нажмите клавишу ввода).
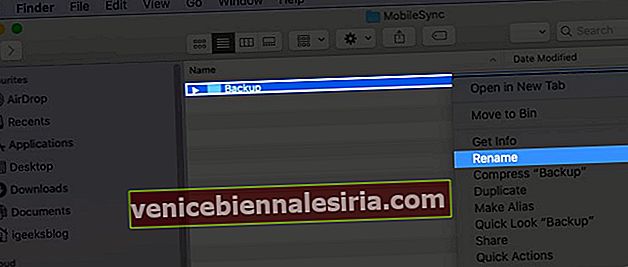 Теперь добавьте к имени файла .old . В результате это имя папки будет иметь вид Backup.old
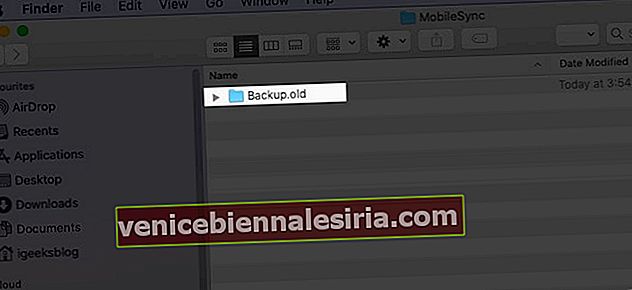
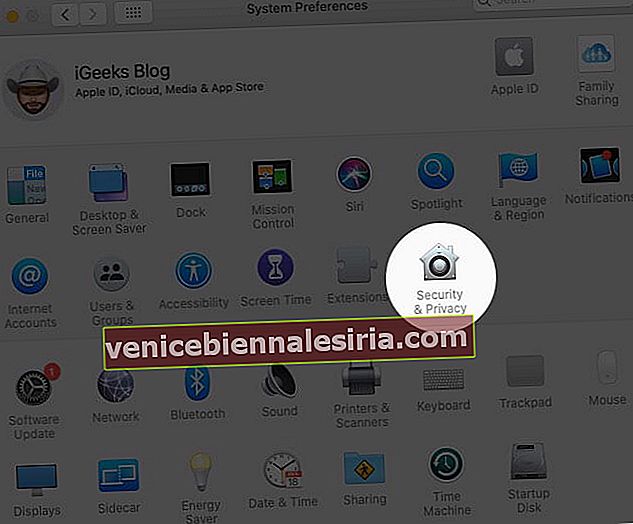
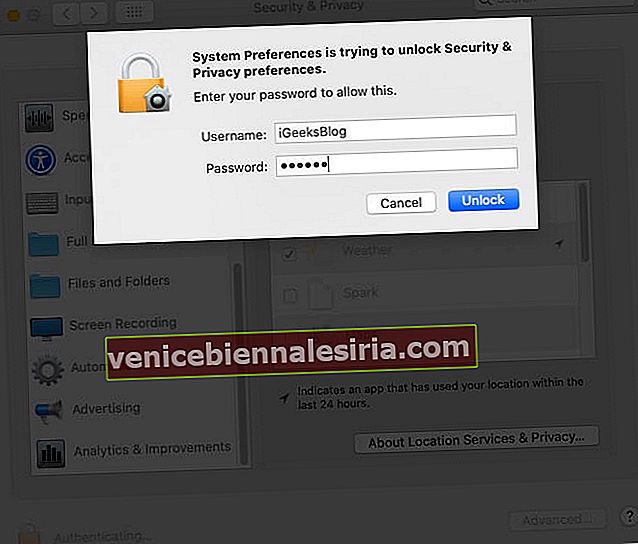
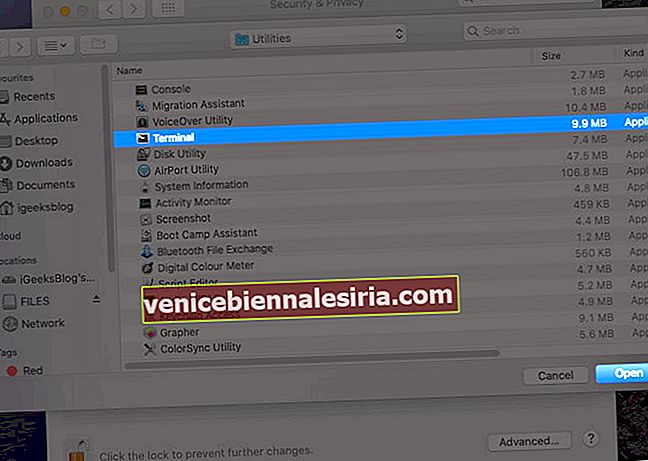
- В левом верхнем углу нажмите на логотип Apple → Системные настройки → Безопасность и конфиденциальность → вкладка Конфиденциальность → щелкните значок замка и введите пароль вашего Mac, чтобы продолжить. Теперь на левой боковой панели нажмите Полный доступ к диску → нажмите крошечный значок плюса ( + ). В папке «Приложение» → «Утилиты» выберите « Терминал» и нажмите « Открыть» . После этого вы можете снова щелкнуть значок замка и закрыть это окно.

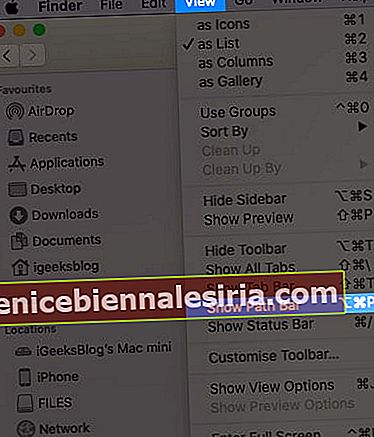
- Теперь вам нужно знать точное местоположение новой папки резервного копирования. Для этого в окне Finder нажмите « Вид» на верхней панели и выберите « Показать панель пути» . Внизу вы увидите тонкую строку, в которой указано точное местоположение этой новой папки резервного копирования. Держите это окно открытым.

- Нажмите Command + пробел , найдите Терминал и откройте его. Затем вам нужно отредактировать следующую команду, чтобы она соответствовала вашему компьютеру, а затем введите / вставьте ее в окно терминала.
ln -s /Volumes/Drive/Backup/ ~/Library/Application\ Support/MobileSync/ - Очень важно: отредактируйте приведенную выше команду: откройте обычное приложение-блокнот или сайт, например editpad.org. Теперь скопируйте приведенную выше команду и вставьте ее туда. Затем вам нужно заменить / Volumes / Drive / Backup / на местоположение вашей резервной папки.
Например, смотрите скриншот выше. Моя папка резервного копирования находится в Macintosh HD → Пользователи → Резервное копирование . Итак, команда будет выглядеть так:
ln -s /Volumes/Macintosh\ HD/Users/Backup/ ~/Library/Application\ Support/MobileSync/Если имя местоположения состоит из двух или более частей / слов, например Macintosh HD, вы должны поставить обратную косую черту и один пробел. Например, Macintosh \ HD
ln -s /Volumes/Donald/Backup/ ~/Library/Application\ Support/MobileSync/ln -s /Volumes/Donald/iPhone/Backup/ ~/Library/Application\ Support/MobileSync/Now, you know how to change the path address in the command. Next, let us make use of it.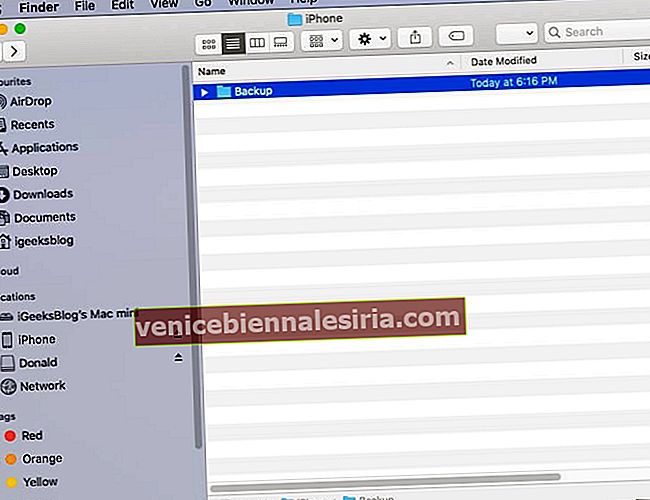
Copy the final command, paste it in the Terminal, and press the enter key.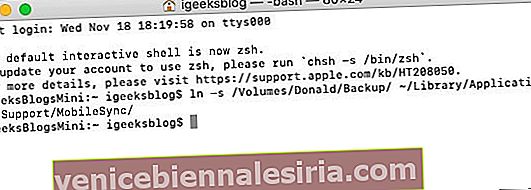 Tip: Now, when you go to the original Backup.old Finder window, you will see a new folder named Backup, which will have a small arrow on it.
Finally, open Finder on your Mac, connect the iPhone, Trust it, and click on Back Up Now. The backup would be made and saved at the new location.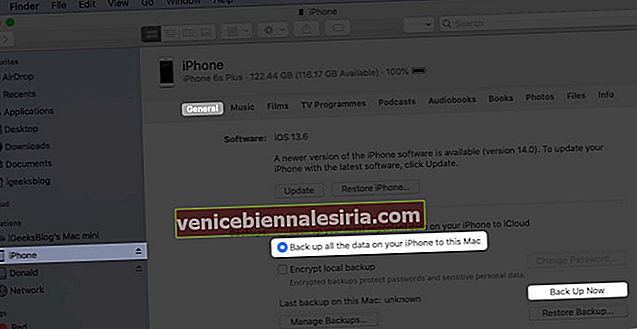


 Теперь добавьте к имени файла .old . В результате это имя папки будет иметь вид Backup.old


 Tip: Now, when you go to the original Backup.old Finder window, you will see a new folder named Backup, which will have a small arrow on it.
Notes:
Optional: After you complete the first backup at the new location, you may choose to delete the Backup.old folder. This may free significant space on your Mac.If you opted to back up your iPhone to an external drive, make sure you connect it to the Mac before hitting Back Up Now in the future.
Restore iPhone Backup Folder to its Original Location on Mac
From the Finder window, click on Go → Go to Folder → and enter this location ~/Library/Application Support/MobileSyncRight-click on the folder with an arrow icon and select Move to Bin.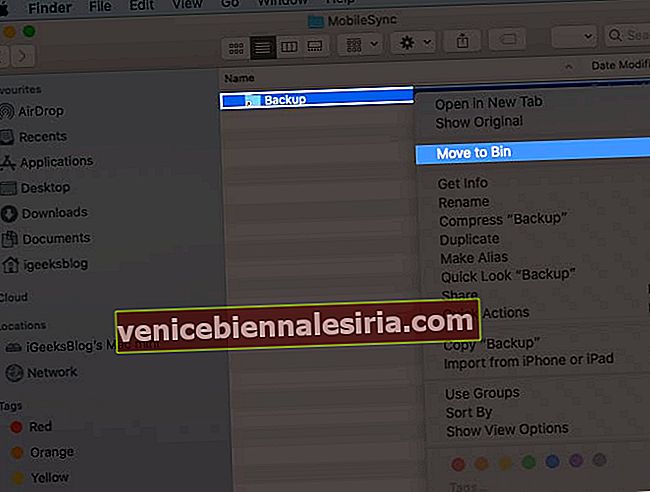
Now, for safety, drag (or copy-paste) the current Backup folder to this location. All future iPhone backups will be saved here, like before. Even if you do not follow this step, the next time you make the device backup, a new folder named Backup will automatically be created.

Do you not want to follow the lengthy process above? Well, here is the most straightforward way to change the iTunes/Finder iPhone backup location on Mac.
How to Change iTunes Backup Location Using iPhone Backup Extractor
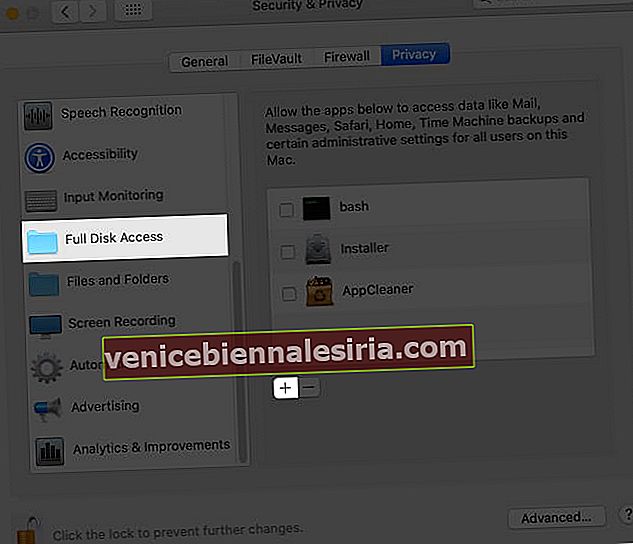
Download iPhone Backup Extractor for free and complete the installation.Important: First time, you may have to open the System Preferences → Security & Privacy → Privacy tab → click on the padlockicon, and enter your Mac’s password. Now, click on Full Disk Access and then the plus sign (+). Next, select iPhone Backup Extractor and click Open.
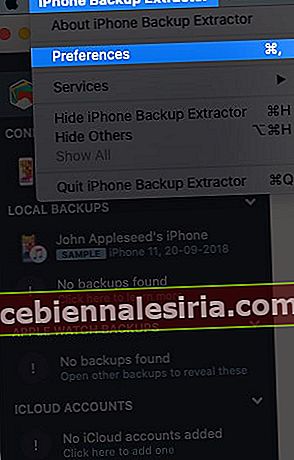
Now come back to the iPhone Backup Extractor app window. (If needed, click on ‘OK, I’ve made this change, let’s restart the app to continue!’) From the top menu bar, click on iPhone Backup Extractor → Preferences → Backups → Change. Now, you may see a popup saying ‘Backup contains data.’ Click on ‘Open.’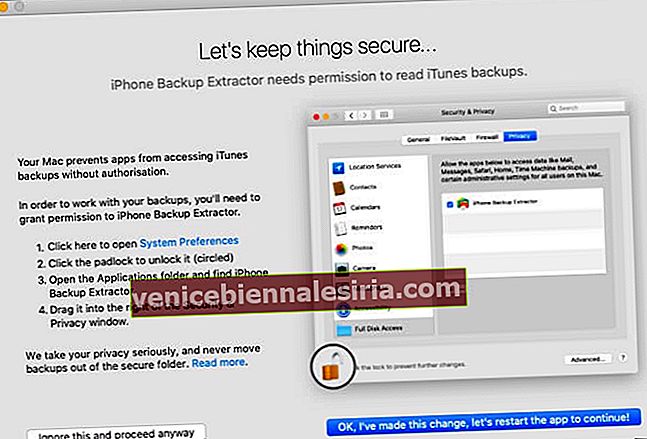
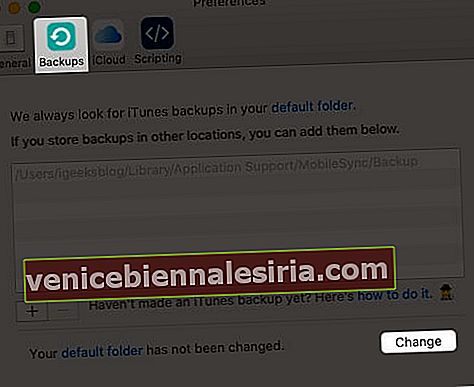
From here, drag the folder with a lengthy name like 149652….. to someplace else, like the Desktop.After that, inside the iPhone Backup Extractor app, click on Change and Select the desired folder.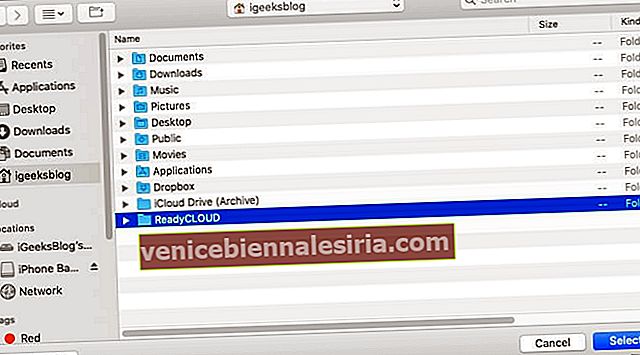


Done! You have successfully changed the iPhone backup folder in just a few steps. To undo this change, click on Revert.
Already Changed iTunes Backup Location But Unable to See the Backup?
Even after you have correctly followed the above steps and are unable to find the backup, then we have a separate guide that has you covered.
Most of the time, if you follow the first manual step, the problem arises due to the wrong location address of the new Backup folder. You must get that right. If this is wrong, go to ~/Library/Application Support/MobileSync and you will see a white Backup symlink instead of a blue folder named Backup with an arrow.
How to Change the iTunes Backup Location on Windows PC
As iTunes won’t let you change it, you need to make way through a symbolic link. Also known as a symlink, it’s a bridge that connects two folders with the same name. Using a symlink, you can direct iTunes to back up data to a dummy folder that you’ll have to create. However, you’ll have to enter some commands in the “Run As Administrator” window. Just make sure that you create a dummy folder in a drive with enough storage space. Like, we created it in D:\. Let’s get started by creating a folder first.
Create a folder named “MobileSync” in the D:\ (d stands for drive) on your computer.To view the by-default location, go to C:\Users\UserName\Apple\MobileSync if you have downloaded iTunes from Windows 10 Store. For the old desktop version, you need to go to C:\Users\UserName\AppData\Roaming\Apple Computer\MobileSyncCut and paste the Backup folder to the new MobileSync folder that you’ve created in D:\Now, run CMD as administrator. To do so, press Windows + R keys together, then type cmd in the search field.Press Ctrl + Shift + Enter to run it as in the administrator.Enter the command mentioned below.
If you’ve downloaded iTunes from the Microsoft store. MkLink /J “C:\Users\UserName\Apple\MobileSync\Backup” “D:\MobileSync\Backup
Enter this code MkLink /J “C:\Users\UserName\AppData\Roaming\Apple Computer\MobileSync\Backup” “D:\MobileSync\Backup” if using the older version.
Now when you back up your iPhone using iTunes, the data will be stored in the D:\MobileSync\Backup folder. Try backing up your iPhone and check if the Backup folder in the D:\ is configured correctly.
iPhone Backup Location Changed Successfully!
This is how you can have new iOS or iPadOS backups to a different location. Changing to some other folder on the same internal disk makes little sense. But doing the same on an external disk frees space on your internal disk.
I hope the above guide was helpful. In case you are facing difficulty at any step, feel free to reach us via the comments section below.
You may also like to read:
Find iPhone Backup Location on Mac and Windows PC3 Ways to Check Folder Size on MacHow to Use Control Center in macOS Big SurHow to Backup and Install iPhone Apps from Mac/Windows Without iTunes


![Как использовать приложение «Клипы» на iPhone [Полное руководство]](https://pic.venicebiennalesiria.com/wp-content/uploads/blog/2353/XBOE2VAZMFpic.jpg)